
I started writing a post that demonstrates how a vendor can use API calls in order to create a better shopping experience and help convert shoppers into buyers. But after a few lines I figured that there is a basic terminology and motivation that might be obvious to me (since I worked in the eCommerce industry for the last 6 years) but not necessarily to the readers… So I decided to write a “pre-post” that will provide an overview about online payment-processing – and only then I’ll move on to implementing API calls and suggestions to improve your conversion rate.
There are many developers out there that build cool software, apps, plugins etc – but have no idea how to sell it. Some of them just open a Paypal/Google wallet/Authorize.NET account, implement their API/HTTP-redirect and think that they’ve done the best thing possible. Well, think again!
Let’s start with some
Definitions & Terminology
“Payment Gateway” or “Payment Processor” – In order to simplify things, we’ll treat the two as the same: a company or a third party in which the merchant (developer) opens a merchant-account and which processes transactions by moving the money from the customer’s issuing bank to the merchants’ bank.
Motivation
There are two major problems with Paypal/G-Wallet/Authorize.NET:
1. You, the developer, need to take care (implement) all the possible scenarios: success, and possible failure reasons (display the proper error), calculate the currency conversion rates, hedge the amount in case the currency-rates change dramatically and the customer asks for a refund (or alternatively, lose money…) and that’s only part of the list of issues that should be handled.
2. Localization: there are so many potential-customers in other parts of the world that won’t buy since your buy-page is not translated to their language and the payment options you offer are not popular in their countries. For example, in the Netherlands (where you process in Euros) there’s a payment method that most of US residents probably never heard of, called iDEAL.
If you’re a good programmer, you’ll probably work hard and solve most of the critical issues in #1, but the issues in #2 are not solvable unless you do one of the following:
- use the services of a professional online payment processor (such as Bluesnap or DR)
- implement a full eCommerce solution…
Of course that there are many other reasons to go with a professional online payment processing solution, and maybe the most important of which is having a fail-over mechanism, for example, if you tried to process a credit-card with Authorize.NET and Wells-Fargo returned a generic error, you can try processing the same transaction with a different gateway instead of loosing business.
Why shouldn’t I use Authorize.NET ?
You may decide to use Authorize.NET, but then you’ll loose market segments such as:
- Businesses in countries which don’t favor credit-card transactions
- B2B – which normaly use PO (purchase orders), check or wire transactions
- Local customers that feel more secure using their Paypal accounts, checks or other payment options
So, When SHOULD a developer use Paypal or Authorize.NET ?
To my opinion only if you do micro-payments, or, if you belong to a small segment of businesses that process mainly local transactions in USD and target customers that use only credit-cards.
Why do I say “almost never” ?
Business owners prefer using Paypal or Authorize.NET because of the low commission-rates (around 3%) comparing to a full payment processing solution which charges somewhere between 5-15% (depends on the transaction amount). But, if we do the math, one deal that you loose because you couldn’t support the payment-method/fail-over mechanism – could “cover” a commission rate difference of another 10-15 transactions!
What I like the most about using a professional payment processing solution is that you can setup an account and start selling in less than five minutes. Want to see for yourself ? Just open an account on Bluesnap sanbox (it’s free!) and follow the go-guide to setup a product: all you have to do is choose a name, short description and a price. After a product was created – automatically the platform creates a contract/SKU – which is the *real* thing that we’ll sell. A good example to understand the difference between a Product and a Contract is to think about a product as “Microsoft Office” and the contract as “Student version” or “Home edition”. You can see that the product is an abstract entity (like a Class) while the contract is the Object or a product Instance if you will.

product setup 1st step

product setup 2nd step
Once a contract was created – you can go to the contract’ “General” settings-page (there are many configurable options – but we’ll ignore it for now), copy the “Buy-link” and paste it into your browser
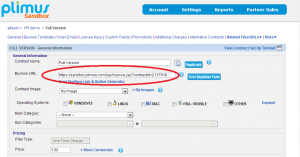
contract setup page
it will take you to your newly sandbox buy-page. If you want to place an order – you can use a generic “Visa” credit-card: 4111-1111-1111-1111 (you can enter any 3-digits in the “Security Code” field) and place an order. An example for such a buy-page: https://sandbox.plimus.com/jsp/buynow.jsp?contractId=1711978
After you’ve gone through that – you’re ready to take the “advanced class” and start playing with the API – on which I’ll write the next post.
Disclaimer
I work for Bluesnap – an online payment-processing company, but with that said, I am not one of the owners and currently I don’t hold any shares/options!
